Tuesday, September 8, 2009

Workflow foundation (WF): Creating a Simple sequential workflow with ASP.NET.


Pre-requisite:This workflow example was created using following configuration
Visual studio 2008
.net Framework 3.5
Article assumes that the user understands the difference between sequential workflow and State machine workflow. For an overview please refer
Sequential Workflow:http://msdn.microsoft.com/en-us/library/ms735937.aspx
State Machine Workflow:http://msdn.microsoft.com/en-us/library/ms735945.aspx
Getting started
Whoever are old .net developer using Visual studio, can relate a WF development similar to the way you develop a webservice ie. You create a webservice and expect a application(usually a asp.net application) to host it,similarly WF service is created and expect a host application to call that service. However Webservice and WF are completely different and are nowhere interchangeable.I will divide this article into 3 parts,
1. Creating a WF, we will look into sequential Console application
2. Create a Host application (an asp.net application).
3. How Host and WF will communicate with each other.
Creating a Sequential Workflow
Steps
1. Open visual studio File > New project.
2. Select c# ->Workflow-> Sequential Workflow Console application.
3. Give appropriate project name (I gave it as CallAnalysis.WF)
Figure1
4. The project will create Workflow1.cs, Workflow1.designer.cs, and Program.cs. Selecting the design mode for Workflow1.cs will show you an empty sequential workflow.(figure1)
Business scenario
Now before we continue lets create our business scenario or objective or functionality that the WF will do. Let’s say you are working as a support analyst for an application where you get calls from application users. Calls can be divided as Incidents and Service request. Further incident can be divided into critical, high and medium and Service request is divided into severity1, severity2 and severity3.
Figure 3
Now let’s maps the scenario to our workflow application. To make things simple we will use the if-else activity and code activity only.
1. Open Tool box and drag the if-else between symbols as shown below.


To


Figure 4

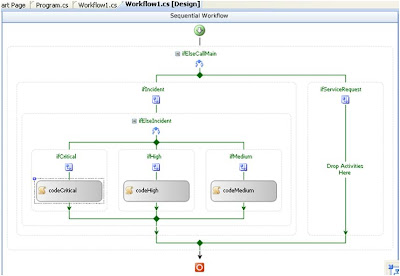
2. Give appropriate names to the ifelseActivity1, ifelseBranchActivity1 and ifelseBranchActivity2. In the drop activity for ifelseBranchActivity1 add an if-else activity. Name the controls as shown below.


Figure 5
3. To explain figure5, workflow start at ifElseCallMain which we will configure later to check for the condition of call. If the call is an incident the control will go to IfIncident else to IfServiceRequest. If call is an incident, then control will go to the if-elsebranch IfElseIncident. Now for IfelseIncident, we need to configure to check for the condition whether it’s critical, high or medium. By default an if-else activity adds two conditions. If we need to add more conditions we need to add something called if-else-branch activity.
4. To add if-else-branch activity, right click anywhere with-in the boundary of ifelseIncident and click Add Branch.
Figure 6
5. Name the new branch as ‘ifMedium’.This will add a new branch called IfMedium for ifelseIncident
Adding condition: Code condition and Declarative rule condition
Now if you see the designer you will find exclamation in red, that says when clicked
Now select ‘IfCritical’ and on the property window select ‘condition’, you will see 3 options None, Code condition and Declarative rule condition.None is the default and we are required to select either of the other two.
Figure 7

Code Condition: When you want your condition to be evaluated based on your custom code. Drawback is the change in condition requires re-compilation.
Declarative Rule Condition: When an expression is evaluated to obtain the Boolean value for the condition. Here a .rules xml file is created that evaluate the condition.
We will explore both of these options. For Incident scenario we will write Code condition and for service request scenario we will use Declarative Rule condition.


CODE CONDITION IMPLEMENTATION:
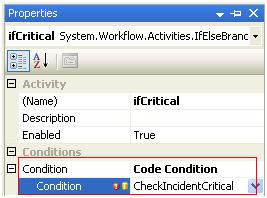
1. Make the following changes for IfCritical, i.e. give the condition property to ‘code condition’.
Figure 8
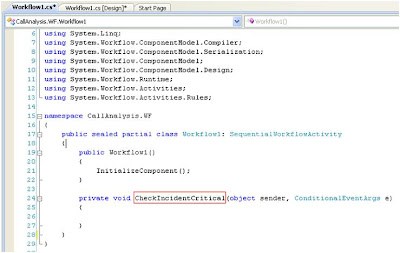
2. This will give an additional property called condition. If you open the view-code for workflow1.cs, the name ‘CheckIncidentCritical’, will be the event names that visual studio automatically generates for you.
Figure 9

3. Make the changes for IfHigh and IfMedium, similar to IfCritical and name the events CheckIncidentHigh and CheckIncidentMedium respectively.
4. For IfIncident too select condition as ‘code condition’ and name the condition property as ‘CheckIncident’. Now do following changes to code

public sealed partial class Workflow1: SequentialWorkflowActivity
{
public Workflow1(){
InitializeComponent();
}
private void CheckIncidentCritical(object sender, ConditionalEventArgs e){
Console.WriteLine("Incident-Critical Reached");
}
private void CheckIncidentHigh(object sender, ConditionalEventArgs e){
Console.WriteLine("Incident-High Reached");
e.Result = true;
}
private void CheckIncidentMedium(object sender, ConditionalEventArgs e) {
Console.WriteLine("Incident-Medium Reached");
}
private void CheckIncident(object sender, ConditionalEventArgs e){
Console.WriteLine("Incident Main Reached");
e.Result = true;
}
}


5. Let’s have our first compilation. Right click the project and select build. Solution should compile without any error.
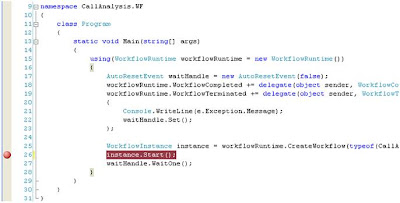
6. Now we are ready for our first run. Open the file ‘Program.cs’, it is the file that is currently helping us to be the Host application. Put a break-point on line ‘instance.start()’ as shown below.

Figure 10

7. Right click the solution and select “debug->start a new instance”. Press F10 until reach next line. Check the console window. Output looks like this

OUTPUT:


Figure 11
Explanation:
1. Ifincident will evaluate to true because of e.result=true in following line of code

private void CheckIncident(object sender, ConditionalEventArgs e){
Console.WriteLine("Incident Main Reached");
e.Result = true;
}

2. Control goes to ‘ifcritical’ where e.result is not set and bool’s default value ‘false’ is taken. Print statement executed.
3. Control goes to ‘Ifhigh’, here e.result is set to true. Print statement executed.
4. Since no more statements follow it. Execution is stopped.
I know here you must be thinking, there seems no big difference since false and true both resulted in printing. So let’s get into little more coding with reading values from input window and seeing the difference. For that do the following changes to design.
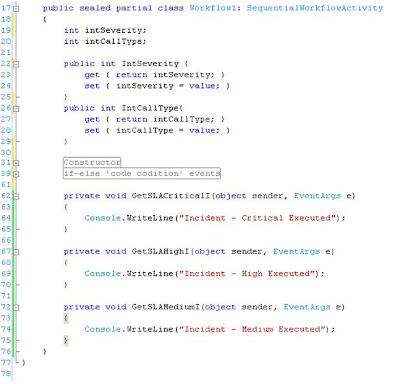
1. Add a code activity (refer figure4 to add a control from toolbox to workflow) for each of the ifcritical, ifhigh and ifMedium activity and associate the code with it such that following changes happen in Design(figure12) and Code(figure13) respectively.

Figure 12
Figure 13
2. Two properties IntSeverity and IntCalltype are defined. GetSLACriticalI, GetSLAHighI and GetSLAMediumI are the excuteCode Property for the code-Activities codeCritical, codeHigh and codeMedium respectively.


3. Now let’s have a re-look of the if-else code condition methods. The value of the properties are used to set the e.result.

Figure 14

4. Now do the following changes to the program.cs. Compile the code.

Figure15

The changes that we did here is read the value of calltype and severity from console and create a dictionary object with following definition. Generic type Dictionary<> is the type the createWorkflow parameter expects.

Dictionary<string,object> callAnalysisParam = new Dictionary<string,object> ();
callAnalysisParam.Add("IntCallType", callType);
callAnalysisParam.Add("IntSeverity", CallSeverity);
}

Another thing to be very careful is the “IntCallType” and “IntSeverity” name should be same name as the Properties that we defined in the Workflow1.cs class
5. Right click the solution and select “debug->start a new instance”. Press F10 until reach next line. Check the console window. Output looks like this
OUTPUT
To be continued ...

1 comment:

  1. Subhanallah. Sairam. Good blog. i am indonesian ( Java etnic ), i have a friend from india, his name is Anil Ravuri.

    ReplyDelete